Installation:
To make things simple, I decided to install CentOS with GNOME desktop on the Controller Node and install CentOS Minimal on the i3 Servers. All the configuration work will be completed on the HP desktop with SSH access to the i3 Servers. During the installations, all defaults were accepted, such as automatic partitioning, and the usual manual configurations were completed, such as setting the hostname, time, date, and timezone.
Yum Local Repository:
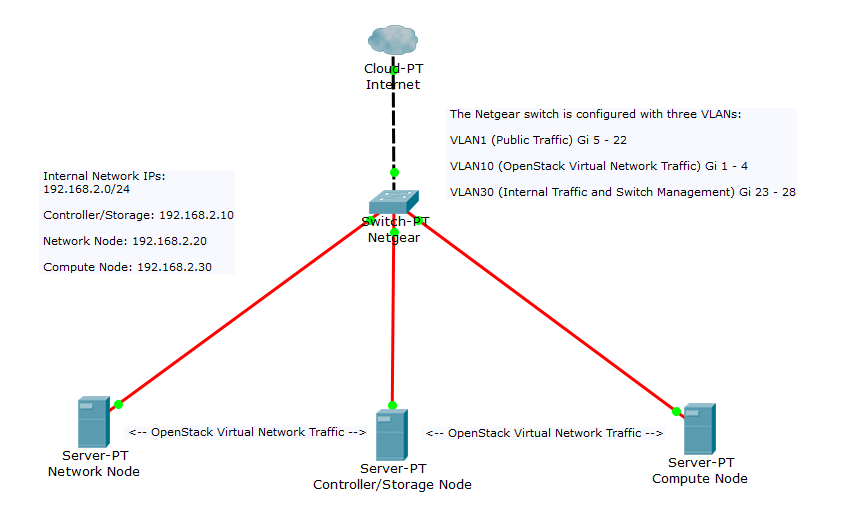
We will configure a local Yum repository on a VM hosted on the Controller Node for the use of our i3 servers to grab required OpenStack packages when required during the OpenStack installation (future posts will include OpenStack installation). Hosting a local repository on the public facing Controller Node is a common best practice used to save Internet bandwidth, or speed up the downloading of repository packages over and over again for other internal networks. In a security perspective, this avoids the Network and Compute node to be exposed on the external network since the repository packages will be obtained from the local HP desktop in the internal network. This also allows a more restrictive environment to restrict what other internal hosts can download what packages.
Configuration Requirements:
Root privileges in the hosted repository system (HP Desktop in this case)
CentOS 7 Everything DVD ISO File – this will be used to host packages from the regular CentOS Installation DVD
Running Apache Web Server to share the repository to our local network
Internet Access from the local repository host (HP Desktop)
Step-By-Step Configuration:
The first local repository will be the regular CentOS packages that RedHat provides:
(Make sure that all commands listed below are executed by root)
- yum install createrepo – createrepo package is required for creating the repository
- mkdir -p /var/www/html/repository/centos/7 – directories are created in the Apache document root to store the packages and share them on the local network
- mount ~/CentOS-7-x86_64-Everything-1503-01.iso /mnt/ – Depending on which version of CentOS that was downloaded, ensure that the correct ISO file is entered correctly. This will mount the ISO file to the /mnt directory. This will give access to all packages that reside in the ISO file. Ensure that the ISO file is located in the /root directory.
- cp -r /mnt/Packages/* /var/www/html/repository/centos/7/ – This will copy all the packages from the ISO file to the Apache directory that was created before and will be shared on the local network.
- restorecon -v -R /var/www/html – This will update the SELinux security contexts for all the new files that were copied.
- createrepo –database /var/www/html/repository/centos/7 – This will create a repository database for the internal hosts to read from when attempting to download a package. Database files will be generated based on the RPM packages in the directory. Yum will therefore, search through the database files when necessary to either search or install a new package.
- rsync -avz rsync://mirror.csclub.uwaterloo.ca/centos/7/os/x86_64/Packages/ /var/www/html/repository/centos/7 – This will obtain all the updates to the RPM packages from a repository mirror closest to the host externally. In this case, the Waterloo mirror was used as it is the closest. A script can be created to do this every day during off-peak business hours if this was a real production environment.
All CentOS packages from the ISO file are now obtainable locally from any internal host while saving significant network bandwidth. The next steps will be to create another local repository that shares all the OpenStack packages required for OpenStack installation and setting up the i3 servers to install packages only from these local repositories.
Commands to create the openstack-ocata repository:
NOTE: The openstack-ocata repository contains all the required installation packages for OpenStack.
- yum install createrepo (if not installed already)
- mkdir -p /var/www/html/repository/centos/cloud/7/x86_64/openstack-ocata
- rsync -avz rsync://mirror.csclub.uwaterloo.ca/centos/7/cloud/x86_64/openstack-ocata/ /var/www/html/repository/centos/7/cloud/x86_64/openstack-ocata
- createrepo –database /var/www/html/repository/centos/cloud/7/x86_64/opentstack-ocata
- restorecon -v -R /var/www/html
NOTE: Additional packages are needed for a successfull OpenStack installation, which are located in the @extras repository. Therefore, this repository needs to be added as well.
- yum install createrepo (if not installed already)
- mkdir -p /var/www/html/repository/centos/7/x86_64/extras
- rsync -avz rsync://mirror.csclub.uwaterloo.ca/centos/7/extras/x86_64/Packages/ /var/www/html/repository/centos/7/x86_64/extras
- createrepo –database /var/www/html/repository/centos/7/x86_64/extras
- restorecon -v -R /var/www/html
Ensure that the Apache service is installed and running in the VM and the Controller. This will allow the repositories to be shared on the local network and allow access to the Horizon dashboard provided by OpenStack.
- yum install httpd
- systemctl enable httpd
- systemctl start httpd
Connecting to the Apache web page may fail. In that case, ensure that firewalld and/or IPTABLES are both allowing port 80. There is also an SELinux Boolean that needs to be enabled to allow connections from different networks.
setsebool -P httpd_can_network_connect on – will allow HTTP connections from other networks to succeed
The repositories are now created locally. The next step is to direct the Compute and Network node to use the local repositories when installing packages with YUM.
(Steps are to be completed on the Network and Compute Node)
- cd /etc/yum.repos.d
- mkdir hold
- mv * hold
- vi myCentosMirror.repo
- vi openstack-ocata.repo
- vi centosextras.repo
File Contents:
myCentesMirror.repo:
[myCentosMirror]
name=my CentOS 7 Mirror
baseurl=http://<IP-Address-of-VM>/repository/centos/7
gpgcheck=0
enable=1
openstack-ocata.repo:
[openstack-ocata]
name=openstack-ocata-repository
baseurl=http://<IP-Address-of-VM>/repository/centos/cloud/7/x86_64/openstack-ocata
gpgcheck=0
enable=1
centosextras.repo:
[centosextras]
name=CentOS Extras
baseurl=http://<IP-Address-of-VM>/repository/centos/7/x86_64/extras
gpgcheck=0
enable=1
The Compute and Network Nodes are now setup to search through the local repositories for any packages that the user defines. However, there is no route to the Virtual Machine on the Controller Node. Therefore, IP forwarding needs to be enabled on the Controller Node, two IPTABLES rules need to be added to the Controller Node, and static routes need to be set on the Compute and Network Nodes.
Run the following commands on the Controller Node:
vi /etc/sysctl.conf – add the following line: net.ipv4.ip_forward = 1
sysctl -p /etc/sysctl.conf – makes the changes
iptables -I FORWARD -i <VM-network-interface> -j ACCEPT
iptables -I FORWARD -o <VM-network-interface -j ACCEPT
Run the following commands on the Compute and Network Nodes:
vi /etc/sysconfig/network-scripts/route-<interface-that-packets-leave-from>
Contents of route-<interface> file:
10.0.0.0/24 via 192.168.2.10 dev <interface-that-packets-leave-from>
NOTE: 10.0.0.0/24 should be changed to the correct VM network that is used.